Sunday, October 11, 2015

Watch the demo video then try Blockitect


I finally have a video on youtube.  It shows off all the current features, be sure to check that out.  I also uploaded the latest build for you to try out on PC or Mac.

Click one of the links below and then click on the download icon at the top to get the zip file.

look for this icon to download


PC version:
https://drive.google.com/open?id=0BzjWK1Fxqv5rTldRTkFTaEV2bWc

Mac version:
https://drive.google.com/open?id=0BzjWK1Fxqv5rcTRQbFh3TmpkZ2M

Here's the controls (video goes in depth):
Escape: quit game
WASD: movement
Q,E: rotate block
Z,X: push/pull block
Home/Backspace: restart the game
F1: save
F9: load
F12: toggle image effects (may help performance)
M: toggle music
Plus/Minus keys: music volume up or down
Semicolon: change sky
Single Quote: change the floor
1 thru 9 number keys: change the height of the camera
Tilde (~) key: reset the height to ground level
hold Right mouse button: speed up / run
hold Left shift key: finesse mode (helps block placement)
Tab: toggles instruction booklet
Left/Right Arrow Keys: page up/down through booklet

Friday, October 2, 2015

Blockitect gets a new Anker Set

I haven't made massive progress since my last post, and I thought for sure I'd have a video by now, but I've continued to add polish to the game in the meantime.  One of the main things I've been spending time on is adding structures into the scene.  These are all built from the Anker plans that are provided in-game.  I always intended to put several in the scene because it gives you something to mess around with, and shows you what can be built with the blocks if you so desire.  Once I added some, I needed more to really fill things out.  It's still not all the models that are given in the plans (there really are a lot of them). 

I've continued to tweak the setting, the sky in particular.  I figure at some point I'll add in a feature for selecting or toggling through several sky variations as I find it's nice to change it up once in awhile (it gets boring looking at the same background all the time). 


I've also substantially improved the stone texture of the Anker blocks themselves.  My early texture looked fine from a distance but up close was very fuzzy and not realistic.  The texture I have now is very high res and looks amazing up close.

Tonight I also finished up adding in the additional blocks needed to incorporate the next set in the Anker series, called 6A.  This is considered a supplement to set 6, which all the sample models in the scene are built from.  Essentially the way Anker sets are organized is that with each additional set, you can build larger and more sophisticated models from the plans provided.  But it requires all the prior sets.  You can always build your own creations from each individual set, but if you want to build the examples Anker provides, it takes lots of sets (which can become very expensive).  You can see set 6A in the foreground of the picture above (with set 6 just behind it).


Sunday, September 20, 2015

First look at Minecraft blocks


This is what minecraft blocks look like when freed from the rigid constrains of the grid.  Pretty cool.  These are just some early tests of low-res textured blocks.  You can also see the result of connected blocks on the right side.  Needs some work, and the ability to connect blocks to each other in-game, but that's coming. 

Meanwhile, I took a break from working on the game tonight to actually play it.  The nice decorative wall on the right was built entirely in-game.  This is the first time I've tried to build something with all the improvements and new features.  I used the in-game Anker build plans I showed off in my previous post, and this worked incredibly well. 

I also found the variable height feature to be very useful.  Unlike my earlier in-game tower build, I had no near-disasters and the resulting structure is considerably more tidy. 

My personal impressions of the game as building toy is that it's time consuming but the results are impressive.  There are some features that could make it faster, grid snap and additional block rotation capabilites for example, but I'll probably leave it as it is.  The challenge and tactile nature is sort of a defining trait.

Deconstruction is just as much fun as construction, and considerably faster

Tuesday, September 15, 2015

Blockitect Game Update

I thought I'd have a video ready to post by now but it has taken longer than expected to get the latest improvements applied to all the existing blocks.  Also I've been implementing new features and tweaking some others.  One of these new features is the ability to look at building instructions in-game.
This is pretty nice, it lets me include the original Anker plans for those who prefer to build off them.  The plan rolls up like a scroll when you're not looking at it, and unrolls into view like you see in the picture (toggles with the tab key).  I haven't yet decided how to let you pick the plan you want to be holding.  For now I'll probably have an up/down key press that cycles through them, but in a later version of the game I may require that you find the plans strewn about the game world, a form of collectible item if you will.

Here's a list of the other features that I've got working now:
  • Number keys set the height of the player (allows you to build tall structures), each number key corresponds to a set height, the "`" key re-sets to the standard height.
  • Q and E keys rotate the held block (parallel to the ground)
  • Z & X keys push or pull the held block in relation to the player
  • Mouse scroll wheel also pushes or pulls the block
  • Finesse mode is active while holding left Shift key, (slows down movement and mouse sensitivity)
  • Run mode is active while holding down right mouse button (speeds up movement, higher jump, and can bump into and affect blocks)
  • Blocks are now picked up with left mouse button and set down/dropped the same way
  • Blocks are thrown with F key (moving/jumping while throwing affects the speed and direction)
  • F1 saves the game, F9 loads

Monday, September 7, 2015

Lincoln Logs are possible!

Today I've had a couple advancements on my blockitect game project.  First, another crucial feature has been implemented: the ability to save the game world. Whatever you build will be there the next time you want to play.

The other feature is a new type of block that I will be incorporating at some point.  I did a very quick and crude test tonight just to see if it would be possible, and somewhat to my surprise, it worked like a charm. 
This is proof that the game isn't limited to basic stacking, but also blocks that have interlocking features can be used.  I think lego might even be a possibility but I would need to come up with a way to make firm attachments so they don't fall apart when you pick up combined pieces.  That's not my main focus though, just a musing at this point.

I think my next post on this project will be a link to a video as I want to show these building capabilities off and once that's done I want to do some promotion to get the word out so that I can get some feedback and response.

I did spend some time today doing some research into games that might already exist in this vein.  To my surprise I really haven't found anything.  I'm sure there are some simple block physics games around, including one that actually helped inspire me to work on this project, which you can find here: Rolling Kinetics - Block Fuse

Nothing I've come across though is really like my game, which is a block building game that incorporates real physics and isn't restricted to a grid like minecraft.  That excites me, because it means it's pretty original, and hopefully people will enjoy it. 

Blockitect is a building game now!

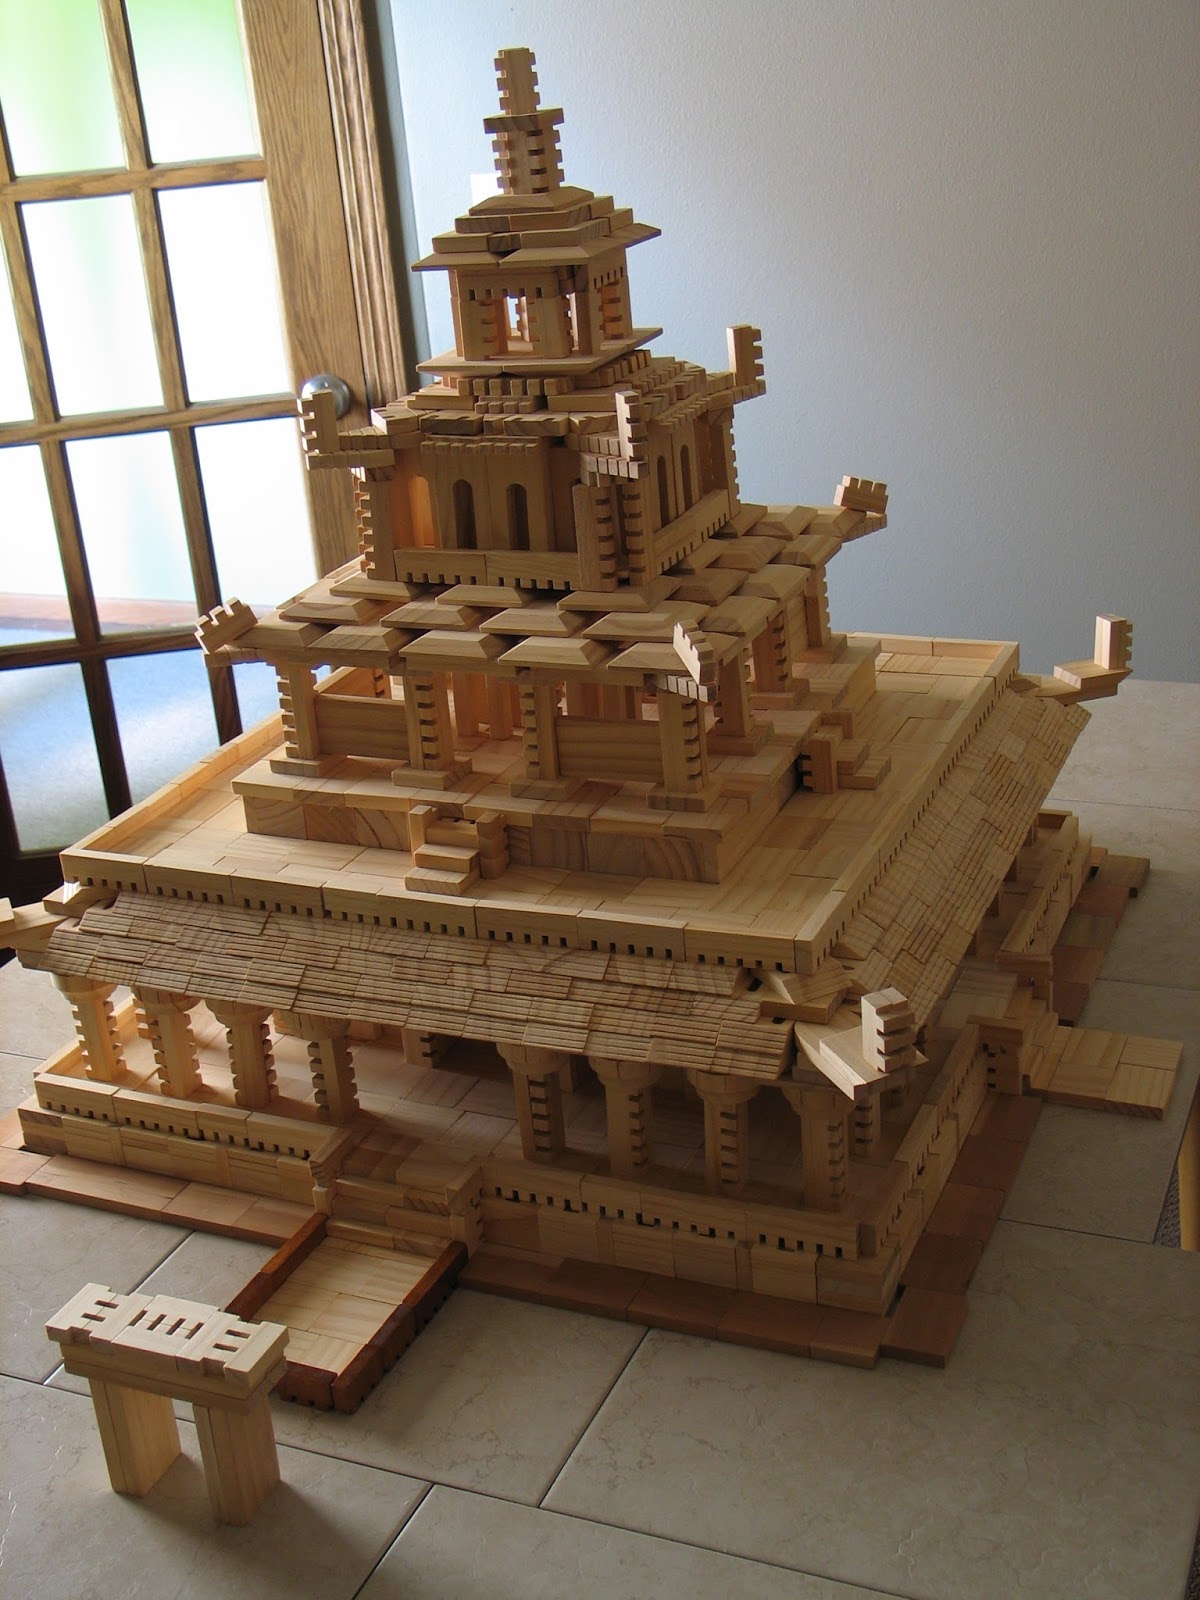
This image represents a truly epic milestone for my latest project.  The not-quite-finished tower in the foreground was entirely built from within the game (as opposed to inside the Unity editor).  This is something I really didn't think was possible.  While I knew that Unity could potentially allow for this, my own limitations and desire to put the time in to learn the scripting skills I thought would be required kept me from having any real hopes that I could take the project to this level.

What I did not realize was just how little the UFPS assets that I was making use of would need to be altered to give me the capability to manipulate the blocks in the game with the precision that you need to be able to stack them so neatly.

A bit of explanation may be in order first.  UFPS stands for Ultimate First Person Shooter.  It's a set of pre-programmed assets and example scripts that allow you to quickly and rather easily get a first person game working.  It happens to allow for picking up physics objects (called rigid bodies) and dropping and throwing them.

While this makes for some fun messing about, there are a number of issues with what I will call the "vanilla" behavior of this grabbing element.  For one, it's imprecise.  The object you pick up wobbles all over.  There are some built in variables that you can change to minimize this, but it's limited on first examination.  It's also very dangerous.  By that I mean that as you move an object around, and especially when you first pick it up, the block you grab onto will very easily knock everything around it into shards.

 Despite this I had some fun with my demo game (which you can find a link to a couple posts prior to this one), with trying to stack some blocks and make a simple structure.  It is possible, just very tedious and frustrating if you want to make something cool (and not risk having it blasted apart by what feels like glitchy behavior).

Trying to build with it did give me some ideas though on what kinds of changes it would require to turn it into something you could seriously build with.  And once I dug into the script I was able to isolate some code that I could see was causing much of the bad behavior.  It's intended to give the grabbed object some "lifelike" motion as you move it about, this wobbling and shaking might appear to give the object some weight and heft.  For some games that might be good, but for me it was bad.  So I carefully modified the code, specifically commenting out (disabling) the parts that related to the wobbling and some other code that caused the block to get dropped under certain conditions.

I also eliminated some code that caused the block to quickly shift from it's initial location when grabbed to a fixed height and location relative to the player.  This was the dangerous part that was making it so that as you picked up a block, it would quickly knock other blocks around it all over the place.

All of these changes, and some other minor tweaks gave me 100% better control over the block when it's grabbed and moved.  So then I noticed that there were still some tweaks needing to be made to get fine grain control over the block.  My game had a normal movement speed and a run speed that you can change to by holding down the shift key.  What I needed now was the opposite of a run speed.  So I altered the run settings to turn them into a slow-motion behavior.  Now holding down shift makes two major changes.  The character moves significantly slower, and the mouse becomes far less sensitive (meaning you have to move the mouse further to get the same amount of change in direction).  These new tweaks allow you to manipulate the block with very fine movements.

So that leaves turning the block.  When I originally pictured what you'd need to make a block game that you could build structures with, I imagined a whole host of very sophisticated keybinds for rotating the block in each direction and for shifting it in small increments, even possibly changing its size.  This is the type of thing that would take a lot of sophisticated programming to achieve.  I find it completely amazing that the physics and my changes to the grab script make all of that unnecessary.  While certainly I can see some benefits if I can ultimately add in some of these types of features, I think it's almost better the way it works now.  It's more tactile and sort of causes you to have to think and learn a skill.  To get the block to turn you just have to bump it up against other blocks, or set it part way on top of one so that when you let go of it, it will fall in such a way that it rotates in the direction you need it to go.  Then you pick it up again maybe move around it or farther away so that you can pick it up and orient it where you want it to ultimately be placed.

Speaking of further away, I found that once I had all this new capability, there was a significant benefit to allowing the player to pick up a block from quite a distance away from it.  The early build has a 3 meter distance limitation for where you can pick up the block from.  I found that if you can pick it up from a larger distance, this allows you to actually lift it high into the air, and set it down on top of a high stack of blocks.  This takes some practice and a steady hand, but it works.  I built most of the tower in the picture from on the ground (though at some points it's helpful to jump up onto it and make fine adjustments).

Well, I could go on for ages about this, I'm completely psyched for how this has developed. The possibilities have just gone through the roof.  I'm debating now just how much I want to add before providing a downloadable version with the building capabilities incorporated.  It's even got me thinking about the possibilities for a viable commercial game.  My thought is that I'd like to make a video demonstration and really try and get it some exposure, find out if people like it and think it has potential.

Sunday, September 6, 2015

Where's the lego?

I haven't spent a lot of time building with lego for quite awhile.  Last year I put forth a huge effort organizing my massive collection and even dedicated an entire room in my house as a building area, but while I got inspired to pick up some new technic sets, I never really got the urge to build anything new and original.

But having set up this blog I want to share some images of my older builds if for no other reason than to expand the blog's coverage to include the blocks that I've undoubtedly spent the most time building with.

So to that end here's a collection of images from my hard drive archives.  One thing that you might notice is that I don't have any lego buildings or castles.  For some reason those never really inspired me in lego, though I enjoy constructing them with other blocks.


Blockitect "Game" Expands

Today the concept for my Unity block game has expanded.  I recognized that there was no reason to limit it strictly to Ankerstein blocks, as incredible as they are.  Once that thought occurred to me, I began thinking about all types of building blocks that might be fun to play with in this virtual space.  First obviously, would be the Treehaus blocks that I also enjoy building with, but why stop there?  I've been doing a bit of research into blocks and other construction toys, and I've been amazed to learn of all types of blocks that I never new existed.  Many of them are no longer manufactured of course, but that doesn't stop me from incorporating them, or some variation on them, into my game.

In a future post I plan to share some of my new block discoveries, and take a bit of a trip down memory lane by posting some images of old block sets and construction toys that I have owned growing up.

Saturday, September 5, 2015

Blockitect Game playable preview


Click this link for an in-browser playable preview version of my Anker Stein based physics game:

Play Blockitect

I will have a downloadable version available soon as well with music and better graphics (and full screen capability).


I hope you find it as enjoyable to play with as it has been working on it.  I'm extremely pleased at how it has gone from a simple idea in my head to a tangible, even beautiful, interactive toy.

I know that it's not yet capable of being a true building game, because while it's possible to stack the blocks on top of one another within the game, the level of finesse and control is severely lacking to enable you to actually build something (it's far too easy to knock it all over).

That said, there's still a lot of merit to this even in it's current form.  If for no other purpose, I think it's a very unique and surreal experience to simply walk around among life-sized structures that you've constructed from simple blocks.  It's something I've done before of course playing minecraft, but these blocks are very different, and the buildings have the potential for far more interesting details.
The physics element is a continual wonder to me.  You can simply tear everything down around you, or you can challenge yourself to a game of Anker Jenga.  Or you can try throwing the various stones to knock the buildings over if you like.  The stones have different mass values according to their size, so some can be thrown very fast and far, and others are heavy and thud to the floor quickly.  I've even managed on multiple occasions to "wedge" thrown blocks into crevices between other blocks.  This is something you'd never want to do with your Anker blocks in the real world.

Another feature that I've incorporated into the "game" is that when you get close to a block, you can see the block's identifying number.  This led me to explore the potential as an alternative to the traditional, sometimes hard to follow building plans.  In the preview version I not only included the packing arrangement and one building for set #6, I've also laid out the complete layer by layer building plan.

While I know this simple game doesn't replace the physical enjoyment of building with actual Anchor stones, there are some benefits besides just messing about.  For one thing, there's no limit to the number or type of stones that I can build with.  I simply need take the time to create them.  And in addition, I can make stones/blocks that don't exist, not limited by the traditional colors.

Tuesday, September 1, 2015

Anker Stein in Unity

While I really like the progress I've made with my Anker block Sketchup project, and continue to work on it, I wanted to post a brief preview of another project I started recently and have made good progress with.  This one has even more potential, and has been incredibly fun to work on.

What I'm showing in these pictures is an early preview of my Ankerstein Unity project. Unity is a free-to-use (for non-profit projects) software utility designed for making sophisticated interactive games.

I've used it sparingly in the past, because the scripting needed to really make a good game is pretty difficult to learn.  However there are a number of game elements that can be purchased, developed by other users, that can make certain aspects of the game making process easier.


Because of that, and with some inspiration derived from my other projects, I decided I could make a pretty decent, if simple, game that while not intended for building structures, would at the least allow a "player" to interact and experience the structures that I've designed (and constructed using the Unity editor), within a fully 3d space.  And not just to look at either, these structures can be fully interacted with using very realistic physics and with sounds as well.


I've been gradually adding blocks, and I'm mostly going to stick to the blocks within the sets that Anker is currently producing, though who knows how far I may eventually take this.  My ultimate goal would be to allow for building structures too, but that will require a lot more skill development within Unity than I currently possess.  For the short term however I would like to get an early build available for download in the very near future that would show off various structures using set #6, for which I have most of the blocks already done.

Tuesday, August 25, 2015

Asian Temple


I've always had a bit of fascination with Asian architecture, and I think it's a testament to the flexibility of the treehaus blocks that I've managed to find ways to use them to evoke a style that they weren't ever intended for. 

Quite some time back I worked on a pagoda style temple like this in minecraft which I really never finished.   But the study I put into it was helpful when I began experimenting with an Asian aesthetic using the treehaus blocks.

Before I worked on this big temple, I built a number of smaller structures as practice and was surprised at how nice they looked, and at the various techniques that could be used to build these types of buildings. 

I began building larger, and had a pretty good sized temple that was similar to the upper structure you see in this build.  That got me thinking even larger and I started seriously contemplating a full fledged pagoda temple, but it wasn't really until I figured out the way I wanted to do the roof that I decided to give it a serious attempt.

Had I known just how close I would come to using every one of those slope blocks in my collection, I might have thought twice before building it quite this large.  Luckily I had just enough.  If I'd had more I think the design might have looked a bit nicer with a couple more layers.  Still I think it turned out very nice over all. 

The third "story"  roof was actually the toughest because by that point I'd basically used up my whole supply of slope type blocks.  I struggled with this for awhile, and almost tore it all down but after thinking about it a few days and experimenting with some other block types I came up with something that turned out pretty good after all.  It's kind of a happy accident that the roof on each level has it's own style, had I had more blocks it may have been more uniform, but as it is I was forced to come up with some different techniques and the finished build is more interesting because of it. 

Another new feature I made use of in this build is the lights.  I was inspired to give this a try by some images of wood blocks I'd come across on Amazon.  The blocks themselves weren't really compatible with the blocks I build with, but the lighting made the models look really beautiful.  When it came time to photograph this temple, I decided to see what kind of lights I could find on the web.  What I came up with were some simple led lights that are primarily intended for putting inside balloons or paper lanterns for decorations at weddings and the like.  These were quite inexpensive and small enough to hide pretty easily inside the building.  The main thing was I didn't need to worry about wires, since the structure was already built and it would have been incredibly difficult to weave wired lights through it without knocking it over. 

Tuesday, August 18, 2015

Anker Stein in Sketchup

Set #6 as it's packed away for storage
I wanted to post some images and discuss my current block project.  I started on this a few weeks ago when I discovered a new type of construction block that's apparently been around since the 1870's.  Not wood or plastic but a type of synthetic stone.  These blocks, called Anker Stein, which translates to Anchor Stone in English, originated in Germany, and have gone through many revisions and iterations but they are still being manufactured using the same old methods.  I have yet to purchase any of these blocks as they're very expensive, but I was so enthralled with them that I immediately began constructing them with Sketchup, which is a free 3d modeling program I've used for years.


I've been working on this for the last couple weekends, and it turns out there is an absolutely huge number of block variations, which in this way makes it more like Lego than the Treehaus wood blocks that I've been building with the most of late.  With so many blocks to model, it took a long time just to get something I could start to build with.  I'm far from getting all the blocks available, but I have enough now that I've been able to build something nice.  The church that's pictured here is a plan that I found on the Anker website.  I think it turned out really well. 


Once I had it built (a time consuming process in itself) I've spent quite a lot of time tweaking the lighting and materials and experimenting with the various style settings that Sketchup provides so that I could get just the right look.  I think these renders look incredible, and are far better than some other cad-type drawings that are being used currently for displaying these models and for making building instructions.
Left side is a rendering with Sketchup, on the right side is Anker Cad
I don't know if this is something other fans of these excellent blocks will find useful, but I'll be interested to know what people think, and willing to share what I've managed to create.  Sketchup is an excellent program, but there's a lot to learn to become proficient with it, and it's not purpose built for making block castles as are the cad programs that have been used for this in the past (though from my research it looks as if those programs are hard to come by now and have issues). 

Monday, August 17, 2015

First post. New blog, old builds.

This is my first post, first time blogging.  This is a place I can share my various block-based creations, projects, and web discoveries related to one of my hobbies: building with blocks.  That includes actual physical blocks, and virtual blocks as well.  So basically anything from wood blocks to Lego to Minecraft.

Since I'm new to the whole blogging thing, this first post is sort of a practice run.  I'll use it to share a few pictures of some of my earlier wood block constructions.

Half Tower
That Half Tower was my first impressive wood block tower.  It blends Treehaus blocks with Blocksmith blocks.  Treehaus are more versatile, cheaper, and I own a lot more, but Blocksmith are more detailed and precision made.  Even though they aren't 100% compatible in size, I find they work well together, and the coloring differences are actually rather nice.


Rook Tower
  The Rook Tower was a bit of an experimental design, attempting to go away from the usual geometric shapes that towers tend to follow.  I like the staggered height use of the half-round blocks in the lower 1/4, giving it a cool pattern.  This photo doesn't show it but I also have a bit of a checker-board look at the base.


King's Landing


This one was a fun attempt to make a sprawling city.  I made use of many new techniques, especially for forming the various walls. 


Ghost Tower
Probably the tallest tower I will ever attempt.  The Ghost Tower made use of every block in my inventory (at that time).  I actually had to slide my dining room table once I realized it was going to hit the light.  Placing the top most blocks was very tricky.  What surprises me most about these large constructions is how durable they are.  It's cool to see how the interesting methods I come up with hold up as I continue to add more and more blocks.

Well that's enough for the first post.  I might go back and post more details and photos of these older builds at some point.